Coal Mine Map Viewer
Help Guide

![]()
|
1. Background
Coal Mine Atlas
Since the first commercial coal mine
in Alberta opened in 1874 on the banks of the Oldman River, more than 2000
mines have operated in the province, producing over one billion tonnes of
coal. The Alberta Energy Regulator (AER), formerly the Energy Resource
Conservation Board, first published ST45:
Coal Mine Atlas – Operating and Abandoned Coal Mines in 1985 to serve
primarily as a guide for identifying areas in the province where mining has
occurred. More detailed information can be found in the mine plans, some of
which may be requested from Information Distribution Services by email at InformationRequest@aer.ca or by telephone at 403-297-8311. Mine Numbers
In 1905, the provincial government
began to catalogue coal mines by assigning a unique number to each operation.
Numbers were assigned to all mines then operating and to a large number of
mines already abandoned. This same system is used by the AER with some
modifications. The mine numbers in the atlas consist of four digits and
currently range from "0001" to "1809." The numbers
"0500" to "0599" were not issued. For various reasons, some coal mines
and exploratory excavations were not assigned mine numbers. These mines are
identified in the atlas by a prefix of four zeros followed by either a
subsequent number or a contraction of the owner's name or mine location
(e.g., "0000ARM" represents a mine operated by F. C. Armstrong). In certain cases, extenders have been
added to some mine numbers. In a case where one owner mined coal in various
locations and retained the same mine number, a suffix with a slash (e.g.,
"/1", "/2") has been used (e.g., 1603, 1603/1, 1603/2).
When unrelated mining operations were given the same mine number, a suffix
such as "/A" or "/B" has been added (e.g., 1137, 1137/A,
1137/B). Mine numbers containing the suffix "/E" are designated as
experimental or exploratory excavations, such as test pits or adits (e.g., 1786/01/E, 1806/E/01). Several shale mines and base metal
prospects were also assigned coal mine numbers. In the atlas, these mines are
identified in the Remarks column of the table titled “Operating and Abandoned
Mines.” 2.
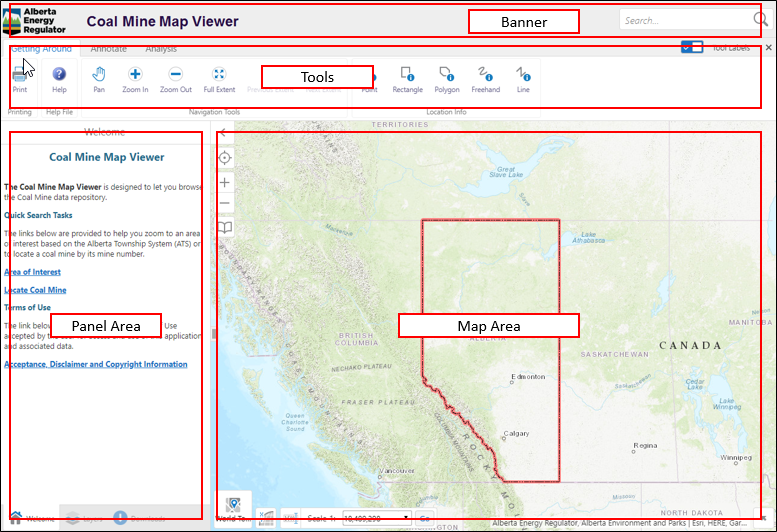
Coal Mine Map Viewer
Overview
The image below shows an overview of the Coal Mine Map
Viewer, which can be divided into four sections: 1.
Banner 2.
Panel
Area 3.
Map
Area 4.
Tools
Banner
This Banner contains the Global
Search tool that can be used find coal mine locations and information on
the map.
Global Search To
search for a coal mine using the Global
Search tool, enter a value, such as a coal permit number, coal mine
number, coal mine name, or coal mine owner, into the search bar and click the
magnifying glass symbol or press the enter key on
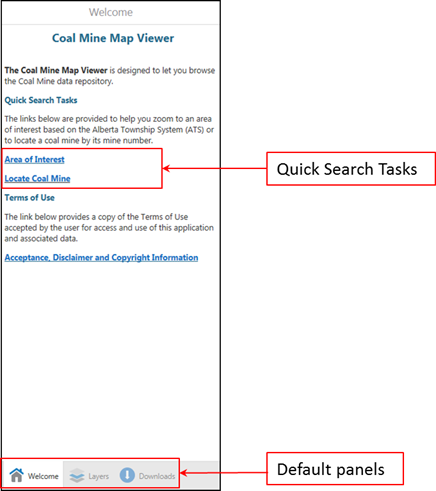
your keyboard. Any results returned from your search will appear in the Map Area. Panel Area
The Panel Area
contains various panels that provide additional map functionality. For
example, the Layers panel lists
all available map layers that can be displayed on the map. When you click on
different panels, the content in the Panel
Area changes to show information related to the panel selected. By
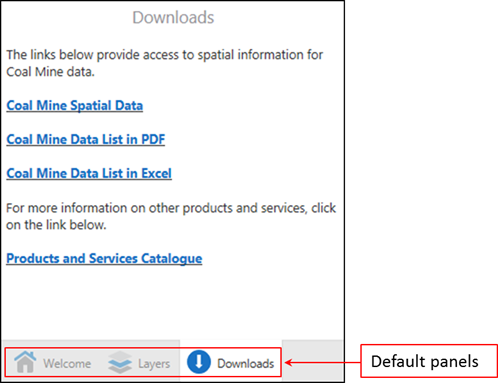
default, there are three panels visible when the map viewer loads: Layers, Welcome, and Downloads.
Other panels are added to this area when tools and links are used in the
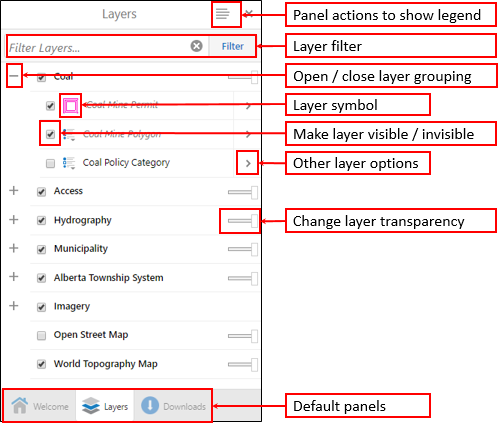
viewer. Layers
Panel
The Layers panel lists all the available map layers and provides the following
functionality: ·
Enter
the name of a layer to filter by. ·
Click the plus or minus symbols to
open or close a layer grouping. ·
Click
the check box to make a layer visible or not visible on the map. ·
Click
and drag the slider to change the transparency of the layer. ·
Click
the arrow to the right of a layer to see options for zooming.
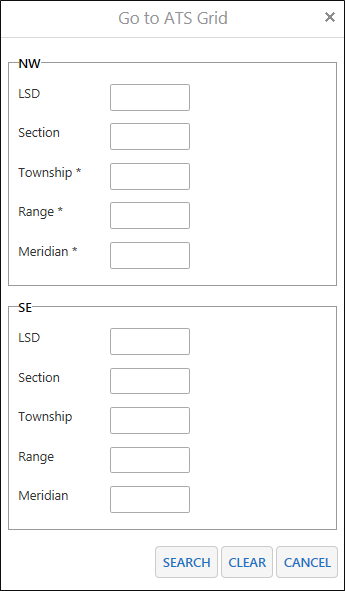
Quick Search Tasks Area of Interest The Area of Interest task allows you to zoom in to an area on the map
that you specify. 1. Click the Area of Interest link to open the Go to ATS Grid panel. 2. Enter your area of interest using the
legal subdivision (LSD), Section, Township, Range, and Meridian fields, where an asterisk (*)
indicates a required field. Specify a point for the top-left corner of the
map (NW) and a point for the bottom-right corner of the map (SE). 3. Click the Search button. The map will zoom to your area of interest. If
information for only one corner was entered, the map will be centred on that
area. 4. To locate a different area of
interest, click the Clear button
to reset the fields.
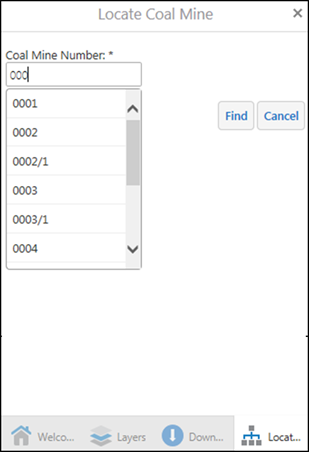
Locate Coal Mine The
Locate Coal Mine task allows you to
locate a coal mine on the map and find information about it, such as its
owner and status. 1. Click on the Locate Coal Mine link to open the Locate Coal Mine panel. 2. Enter a Coal Mine Number. An autocomplete drop-down list will appear as you
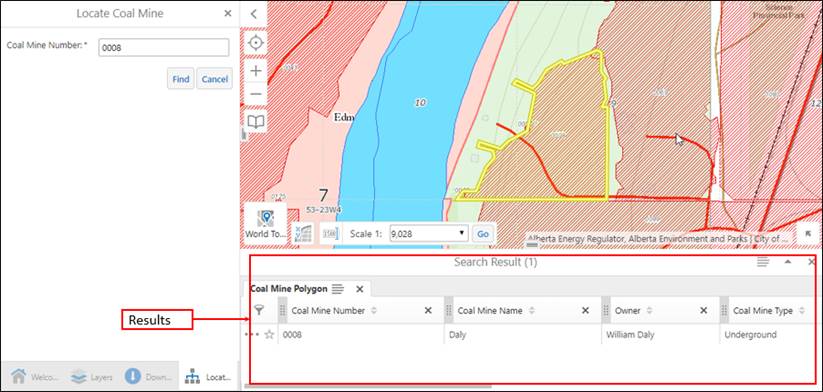
type the number. You can select the coal mine from the list. 3. Click the Find button to locate the mine.
The map zooms to the coal mine (shown
by the red symbol), and details about the mine appear in a table below the
map.
Downloads
Panel
The Downloads panel provides links to download coal mine spatial data
and information or to access the Products and Services Catalogue.
Coal
Mine Spatial Data Click the Coal Mine Spatial Data link to download a shapefile with coal
mines in Alberta. Coal
Mine Data List in PDF Use the Coal Mine Data List in PDF link to download a PDF file containing
a list of coal mines in Alberta and related information. This file will open
in a new tab in your browser. Coal
Mine Data List in Excel Click the Coal Mine Data List in Excel link to download a Microsoft Excel
file containing a list of coal mines in Alberta and related information. Products
and Services Catalogue Click the Products and Services Catalogue link to open the webpage for the
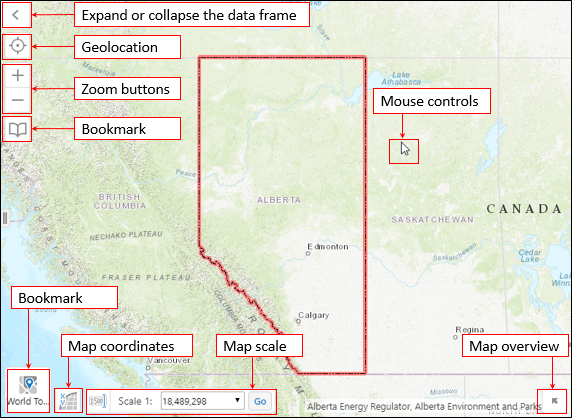
catalogue, which will appear in a new tab in your browser. Map Area
The Map Area
displays the selected map layers, with spatial information shown using
shapes, colours, and symbols. This area also contains
basic navigation tools to help you interact with the map.
Your mouse can be used to control
various actions: ·
Use
the mouse wheel to zoom in and out on the map. ·
Double-click
an area of interest on the map to zoom in to that location. ·
Pan
(move) around the map by clicking and holding the left mouse button. Then
drag your mouse left, right, up, or down to pan the map in that direction. Geolocation The geolocation tool can be used to
find your current location and display it on the map. The map will zoom to
your location and highlight it on the map. Depending on the settings of your
browser, a dialog box may appear asking for permission to know your location.
For this tool to work, you must click Allow. To view an
area on the map in more detail, click the plus or minus buttons on the
top-left corner of the map to change the zoom level.
The bookmark tool allows you to save a
snapshot of your current map extent. To do this, select the Bookmark Current Extent option. A
dialog box will appear for you to enter a name for the bookmark. This tool
also allows you to load previously saved map extents by selecting the desired
bookmark. To delete a saved map extent, click the X next to the bookmark name. (In some browsers, a dialog box may
appear asking permission to store files on your device. For this tool to
work, you must click Allow.) Basemaps A basemap provides a background of geographical data such
as roads, rivers, boundaries (city, province), and elevation, or a background
with satellite imagery. Each basemap provides a different setting to view
spatial data on the map, and it is easy to toggle between basemaps. To do
this, click the Basemaps button to
choose which basemap
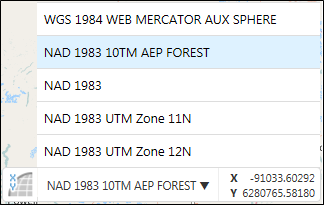
to display. Click the map coordinates button to open the widget menu.
Map coordinates are displayed as geographic longitude (X) and latitude (Y)
decimal degrees in the WGS 1984 Web Mercator Auxiliary Sphere coordinate
system. These values update dynamically as you move the mouse around the map.
It is also possible to change the coordinate system by clicking on the
triangle symbol beside the coordinate system.
Click on the map scale input box button to open the map scale widget drop-down menu, where you can choose a scale. Once you choose a scale, click Go to update the scale. Click
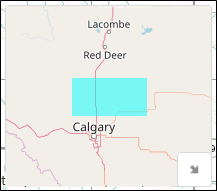
on the overview map button to open a small box that displays a
generalized view of the map. The overview map allows you to view your general
location without having to zoom out.
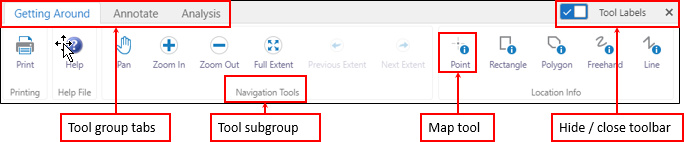
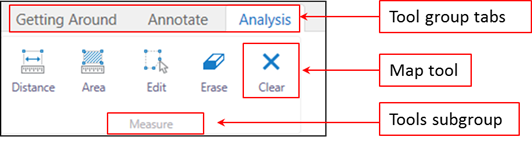
Tools
The Tools toolbar is located under the Banner and contains tools to navigate the map or to perform a
variety of tasks. Tools are grouped on three tabs: Getting Around, Annotate,
and Analysis. Getting Around
The tools on the
Getting Around toolbar help you quickly move around the map and see
detailed information about map features.
Print Print the map at the map
extent shown in the Map Area.
Help Open the help guide in a new tab in your browser.
Pan Pan (move) the map in any direction. To pan the map,
click on the map and drag it in any direction. Use this tool to return to
panning after you have used other tools. Zoom In Zoom in to an area of interest on the map by clicking on the map and dragging the mouse to draw the area. The map is centred on the area drawn.
Zoom Out Zoom out to an area of interest on the
map by clicking on the map and dragging the mouse to draw the area. The map
is centred on the area drawn.
Full Extent Zoom out to the full view of the map.
Previous Extent Zoom to the
previous view of the map.
Next Extent Zoom to the view of the map that was
displayed before clicking the Previous
Extent tool.
Point Identify
data at a particular point anywhere on the map. Any features beneath the point
you click will be listed in a table below the Map Area.
Rectangle Identify
features by drawing a rectangle over an area on the map. Any features beneath
the rectangle will be listed in a table below the Map Area.
Polygon Identify
features by drawing a polygon over an area on the map. Any features beneath
the polygon will be listed in a table below the Map Area.
Freehand Identify
features by drawing a line in any direction on the map. Any features that intersect
with the line will be listed in a table below the Map Area.
Line Identify
features by dragging a line in any direction on the map. Any features that
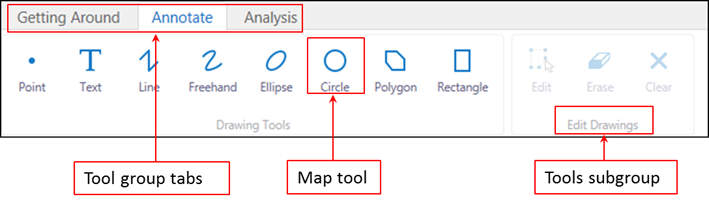
intersect with the line will be listed in a table below the Map Area. Annotate
The tools on the Annotate toolbar can be used to label a point or area on the map.
Point Draw a point on the map. The shape,
position, and colour of the point can be changed using the Styles and Edit tools.
Text Add text to
the map. Click on the map and type the text. The font, size, and transparency
of the text can be changed using the Styles
and Edit tools.
Line Draw a
straight line on the map. Click on the map to draw a line in any direction.
Click again on the map to change the direction of the line. Double-click on the
map to end the line. The style and colour of the line can be changed using
the Styles and Edit tools.
Freehand Draw freely on the map in any
direction. The style and colour of the line can be changed using the Styles and Edit tools.
Ellipse Draw an ellipse on the map. Drag the
mouse to change the shape and size of the ellipse. The colour of the ellipse and
the style of its border can be changed using the Styles and Edit tools.
Circle Draw a circle on the map. Drag the
mouse into the centre of the circle or outwards to change the size of the
circle. The colour of the circle and the style of its border can be changed
using the Styles and Edit tools.
Polygon Draw a polygon on the map, clicking
the mouse to change direction. Double-click to stop drawing. The colour of
the polygon and the style of its border can be changed using the Styles and Edit tools.
Rectangle Draw a rectangle on the map, dragging
the mouse across the map to change its size. The colour of the rectangle and
the style of its border can be changed using the Styles and Edit tools.
Edit Edit any text or drawing added to the
map. Rotate the text or drawing by clicking and dragging the square above the
middle of the graphic. Move text by clicking and dragging it. Change the
shape of a drawing by clicking on it and dragging any of the points in any
direction. To edit text labels, click on the text and enter new text in the Change Text dialog box that appears.
This tool is also on the Analysis
toolbar.
Erase Erase drawings and text labels on the
map one at a time by clicking on each one. This tool is also on the Analysis toolbar.
Clear Clear all text and drawings from the
map. This tool is also on the Analysis
toolbar.
Styles Change the style of text or drawings.
The Styles tool is not shown by default.
It appears when you click any of the Annotate
tools. The styles available differ depending on the Annotate tool being used. Analysis
The Analysis toolbar contains tools that can be used to conduct
spatial analyses.
Distance Measure
distances on the map by drawing lines. Click on the map to start a line
segment, and click again to end the segment. Line segments will be added
until you double-click to finish the drawing. Once finished, the distance for
each line segment and total distance of all line segments will appear.
Area Measure an
area of the map by drawing a polygon. Click on the map to start drawing a
line. Single-click to draw new line segments. Double-click to finish the drawing,
and the area inside the lines will be drawn. Once finished, the area and
perimeter of the polygon will appear. The distance of each line segment will
also appear. In the image
below, the numbers indicate the order in which points were clicked. After
double-clicking on point four, the final line (in red) is automatically added
by the tool to create the polygon.
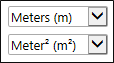
Unit The Unit tool is not shown by default. It appears when
you click the Distance or Area tool in the Analysis toolbar. Click the arrow to open a drop-down
list to select the unit for distance or area measurements.
3. Map
Viewer Functionality
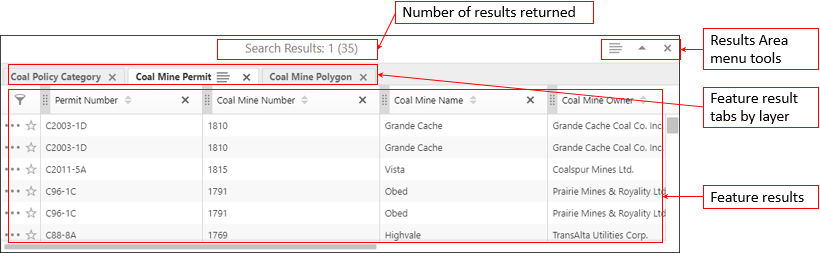
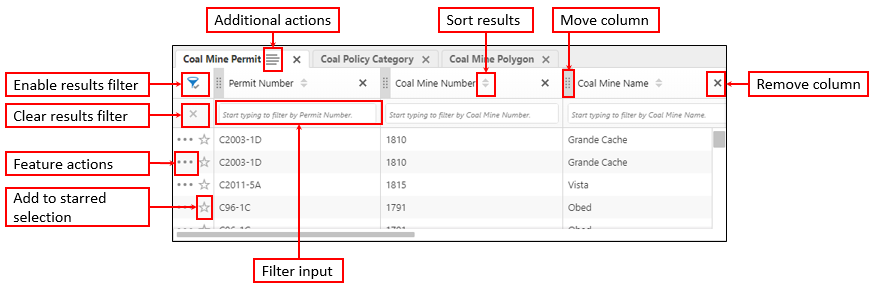
Results Area – Table Format
When features are identified on the
map, they appear in a results table at the bottom of the Map Area. Results are grouped based on the layers available in
the map viewer, with each grouping represented as a tab. Clicking on each tab
will change the features shown in the results area, and only the results
relating to that layer will
be shown in the table and on the map.
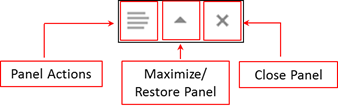
On the top-right corner
of the results table are additional tools to change how the results are
viewed.
·
The
Panel Actions menu provides the
following options: o
Switch to a List – Select this option to move the
results into the Panel Area. o
Show Buffer Options – Use this tool to identify other
features near these results on the map. ·
The
Maximize/Restore Panel option
will maximize the
results frame to cover the entire Map
Area. Clicking the icon again will change it back to its original size. ·
The
Close Panel option will close the
results area. In some cases, a search may generate a
large number of results. In these cases, results can be filtered or sorted
using a variety of tools available in the results table.
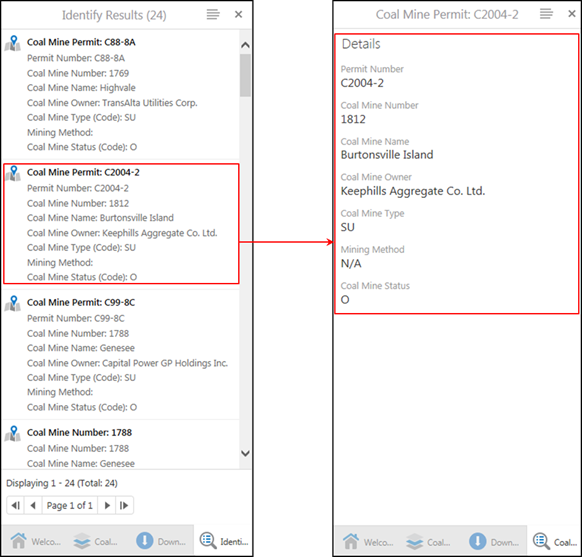
Results Area – List Format
Switching to the list format will list
the results in the Panel Area.
Click on a feature in the list to view more information about it. This
information will also appear in the Panel
Area.
|